

If you’ve ever watched your rabbit thump around a cramped pet store cage and thought that there has to be a better way, you are not alone.
Many bunny owners want a spacious, safe spot their pets can actually enjoy without spending a fortune, and that’s why many people turn to building their own DIY rabbit hutch.
It’s easy to build, budget-friendly, and lets you create something tailored just for your rabbits’ size, personality, and your space.
In this blog, we’ll look at different types of hutches you can build and provide clear step-by-step instructions.
You’ll also learn tips to keep everything clean and comfortable in the long term.
Why Build a DIY Rabbit Hutch?
Building a rabbit hutch yourself saves money and gives full control over the design.
Store-bought hutches often cost more and may not match the size or features your rabbits need.
It usually costs far less than buying a ready-made hutch, and you can customize the size, height, and layout based on your rabbits and available space.
Many builders also find the process satisfying because creating something useful with their own hands feels rewarding.
A DIY setup can also improve the overall design, making it easier to add better ventilation, stronger safety features, and simple cleaning access.
Another advantage is material choice, since building it yourself allows you to use familiar or affordable materials that you trust for your rabbits’ safety.
Different Rabbit Hutch Plans to Try
DIY rabbit hutches come in many styles to suit different spaces, rabbit numbers, and personal preferences. Each option offers a unique style, benefits, and flexibility.
1. Traditional Rabbit Hutch Plans
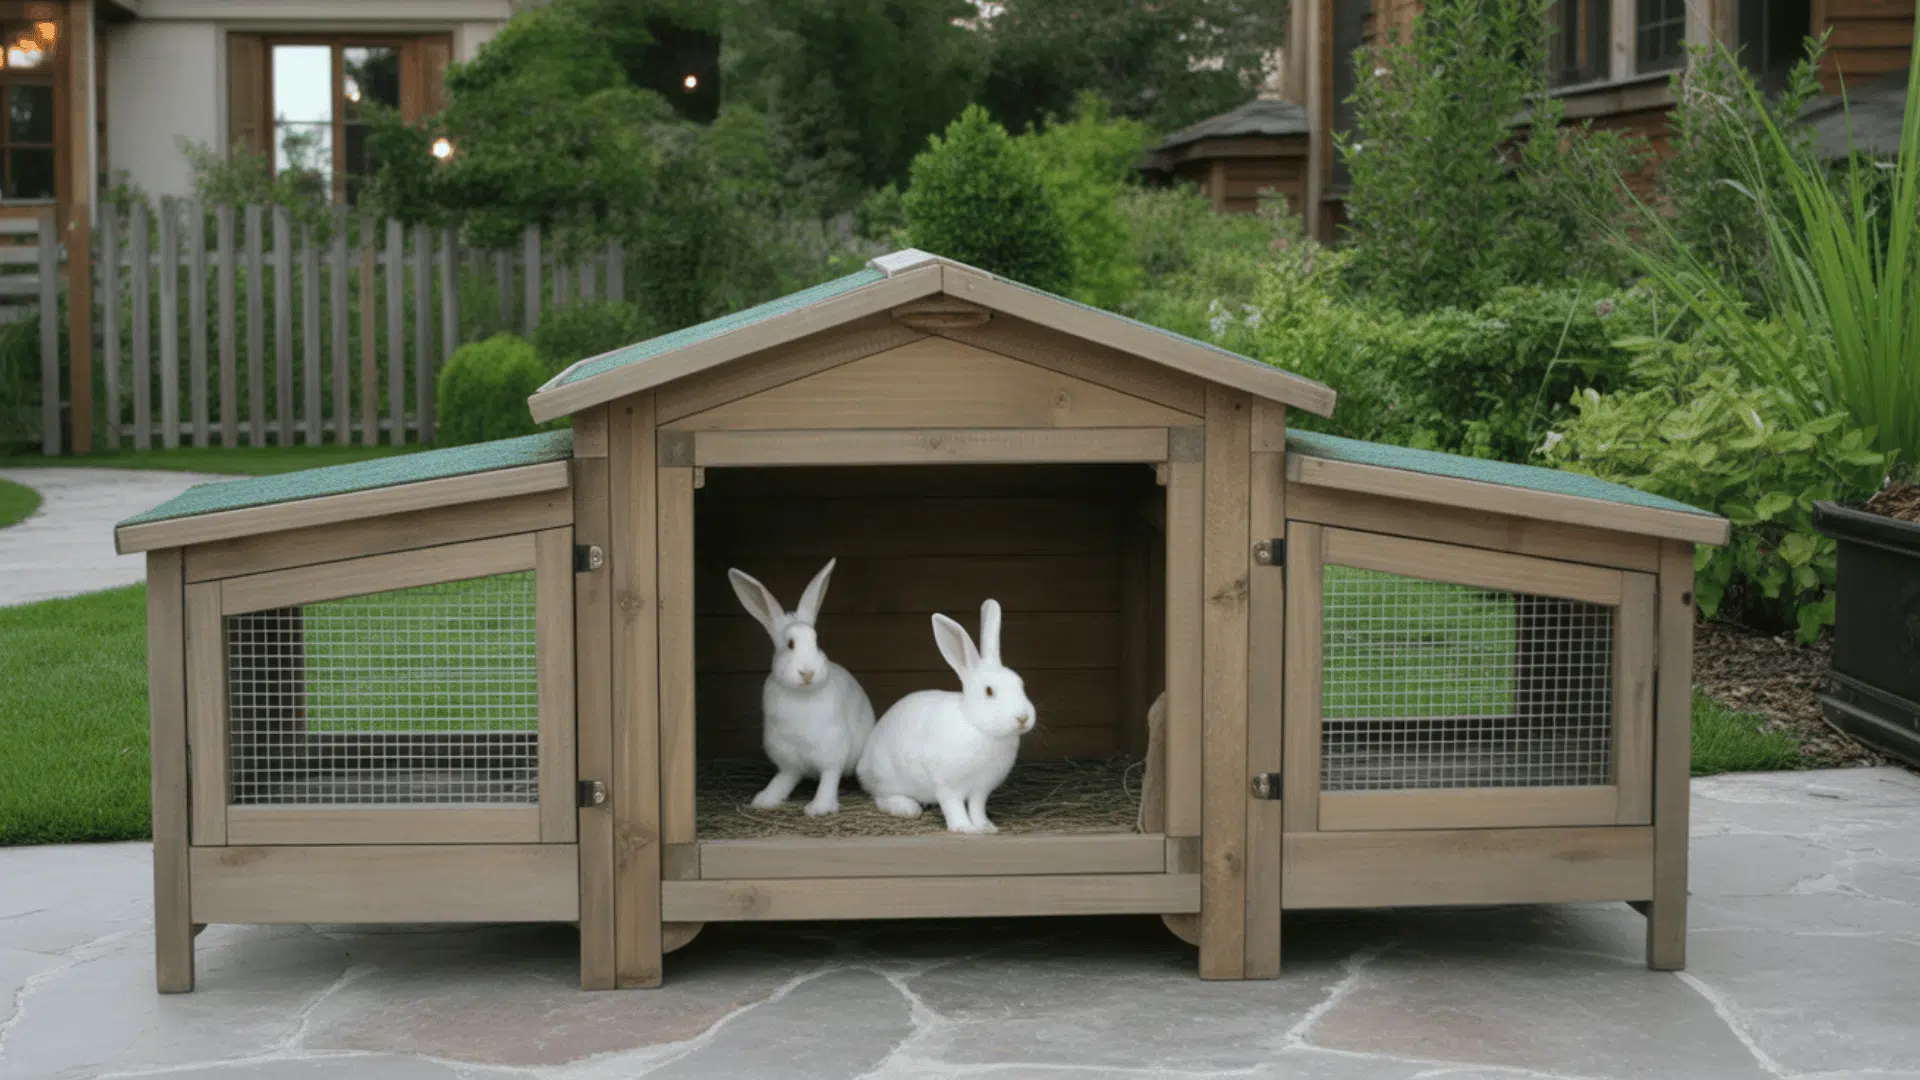
Rustic rabbit hutches are crafted from natural wood, creating a warm, classic look that blends well with gardens or backyard spaces.
These designs often include pitched roofs, solid wooden panels, and wire flooring to support airflow. They work especially well for outdoor setups and typically suit one or two rabbits.
The sturdy build helps handle changing weather while maintaining a cozy feel. This style is ideal for outdoor spaces that prefer a traditional, farmhouse-inspired look.
2. Modern Rabbit Hutch Plans
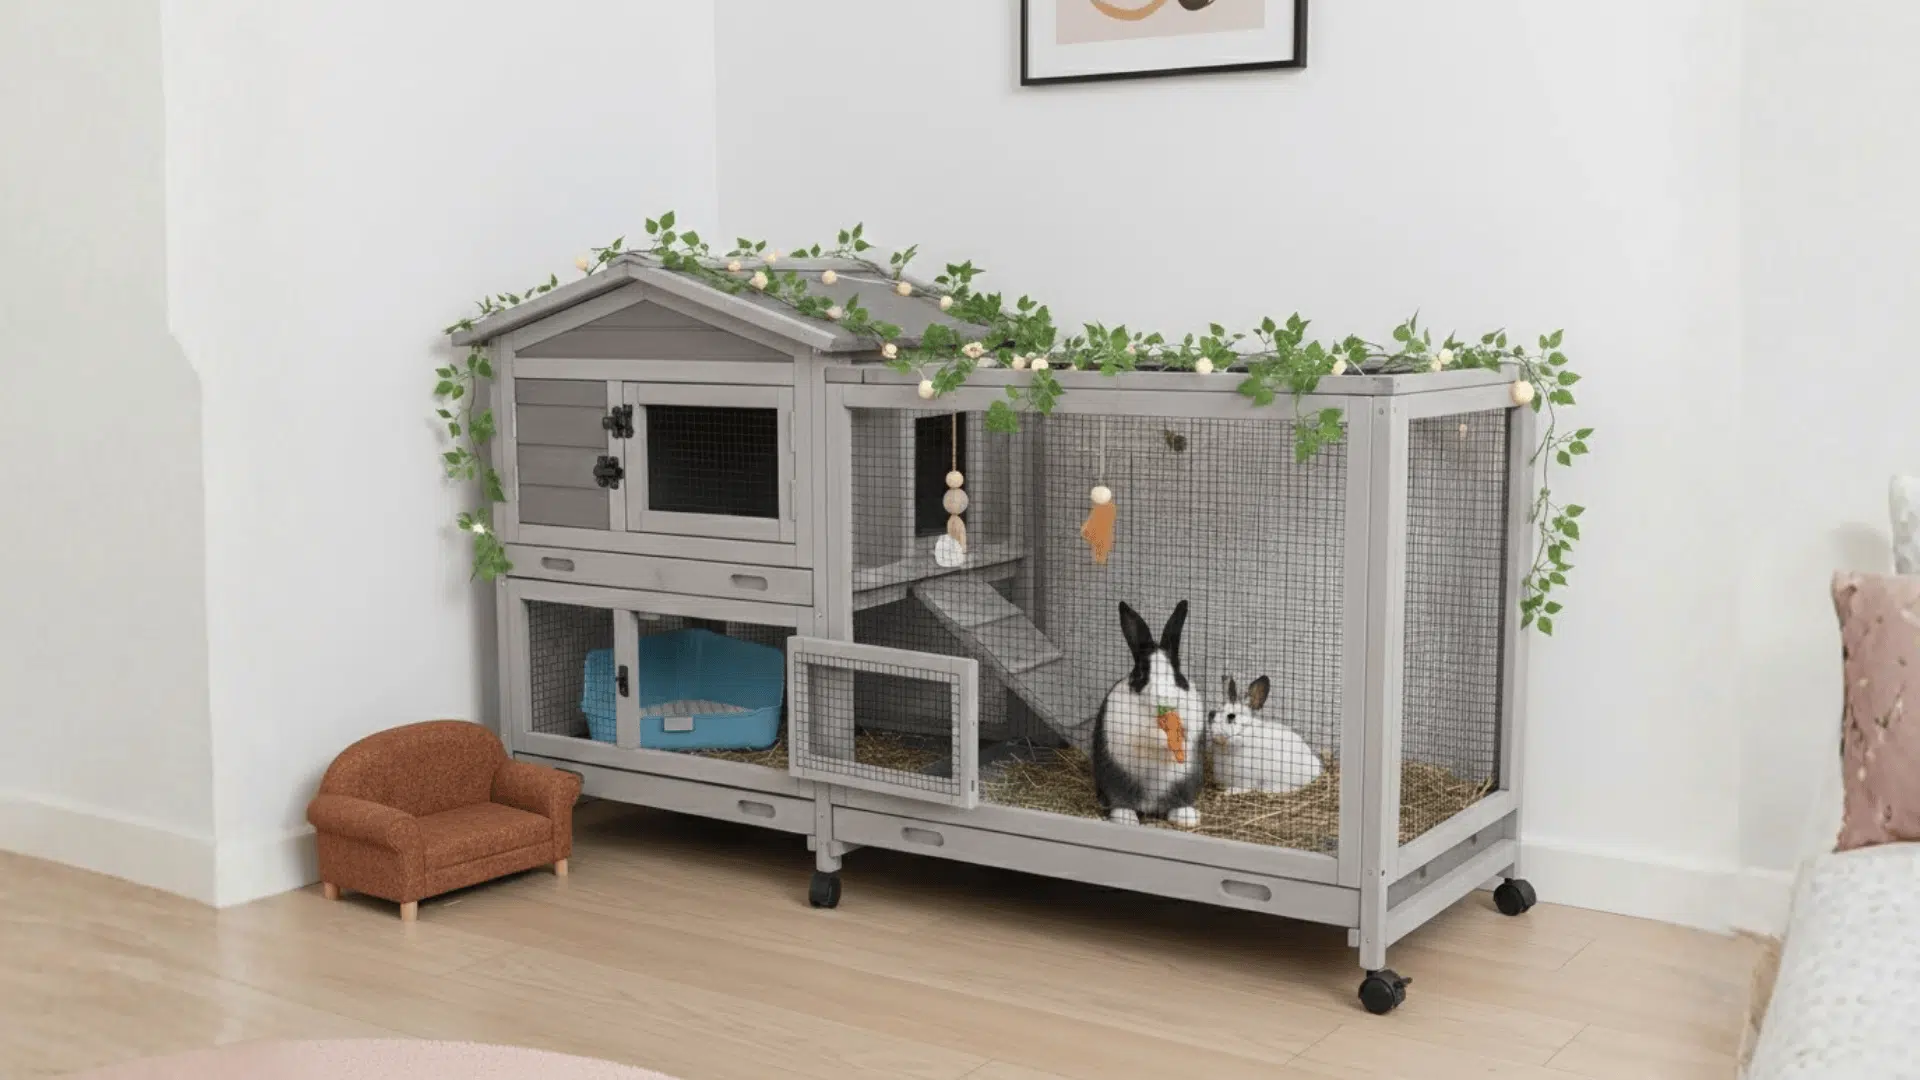
Modern rabbit hutches focus on clean lines and adaptable layouts. They often feature neutral-colored frames paired with wire panels or clear sections for visibility and ventilation.
Many designs allow sections to be added or removed, making them easy to move or adjust as space needs change.
These hutches fit well in apartments or indoor settings and are best suited for owners who want a neat, updated appearance with practical flexibility.
3. Eco-Friendly Rabbit Hutch Plans
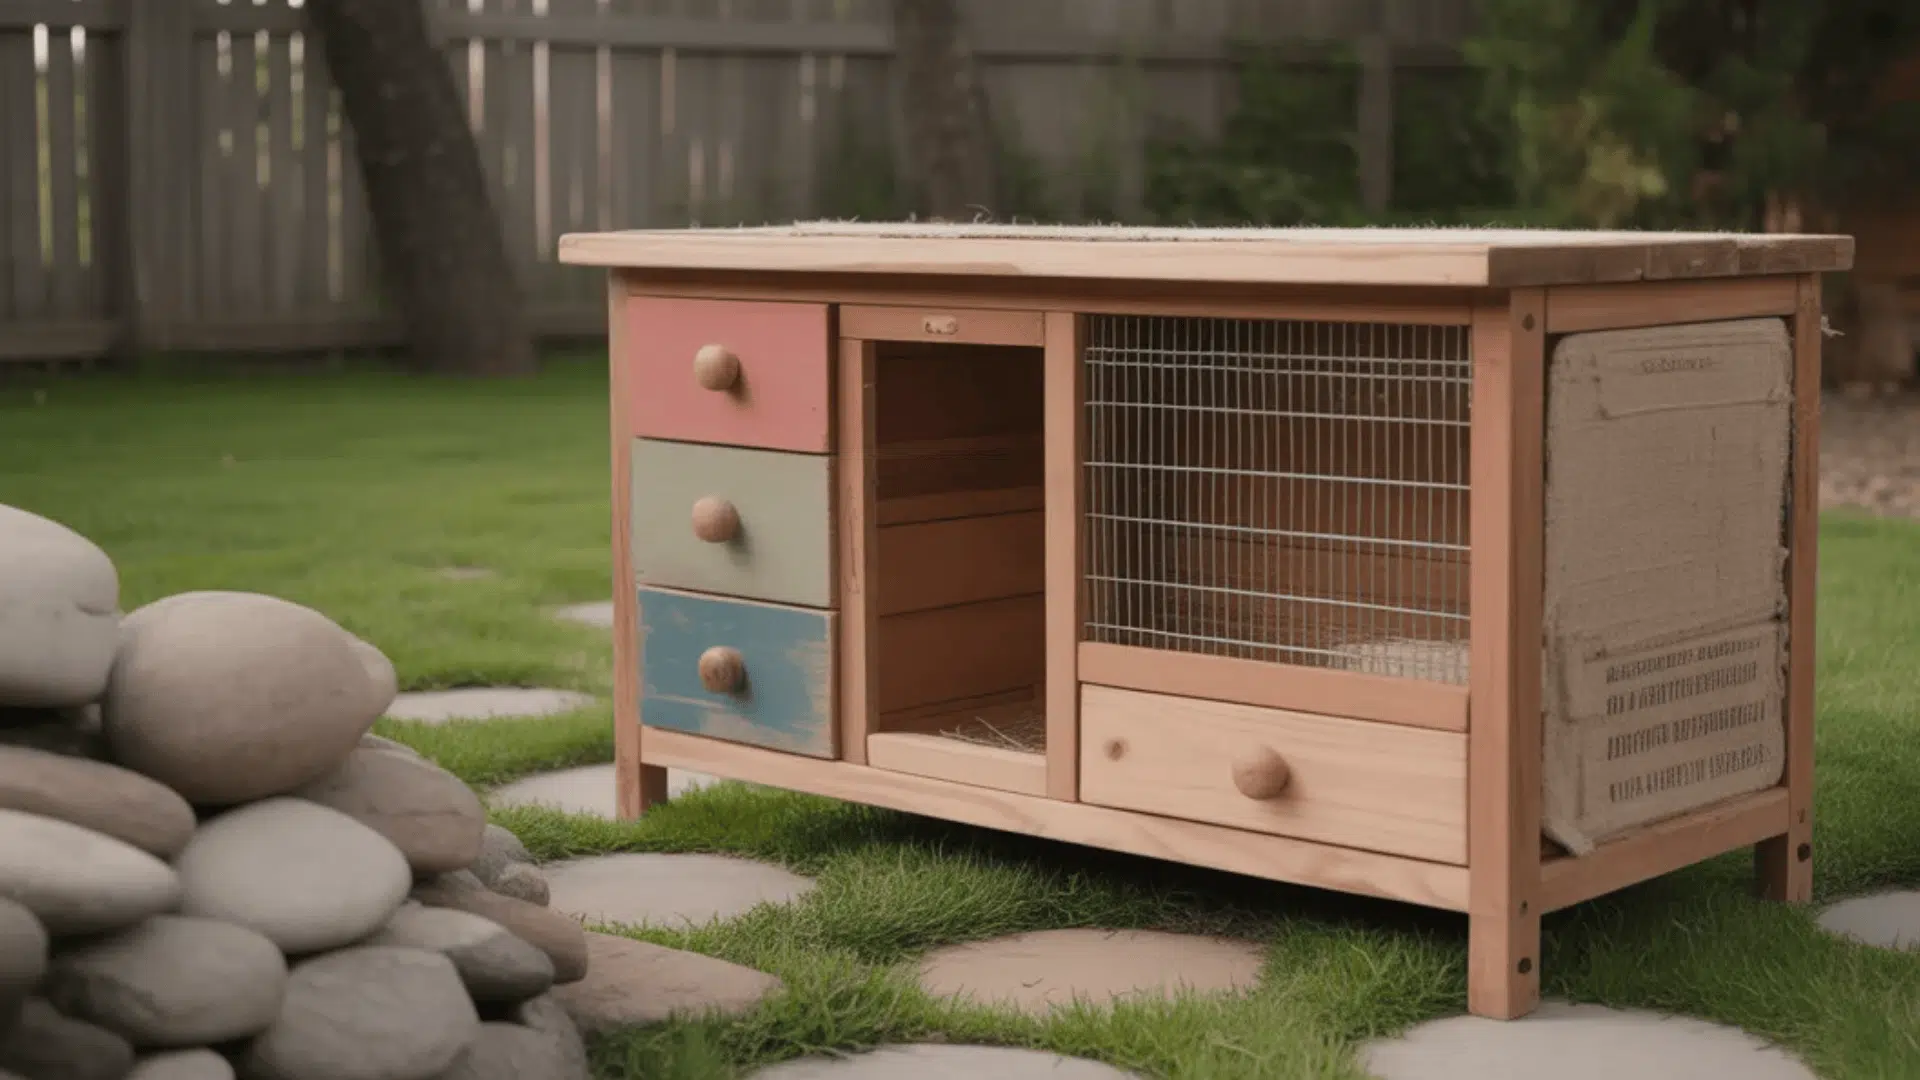
Eco-friendly rabbit hutch designs use reclaimed wood or recycled materials, giving them a natural, handcrafted look. Uneven wood textures and simple finishes give a unique style while reducing waste.
These hutches provide a safe, functional space for rabbits and work well in outdoor or semi-indoor settings.
They make a great choice for owners who value sustainability and want a low-impact, budget-conscious building option.
Materials Needed for DIY Rabbit Hutch Plan
Gather these basic items to keep things affordable and sturdy. Most items come from hardware stores or home supplies.
| Item | Quantity |
|---|---|
| Pressure-treated 2×4 lumber | 8 pieces (8 ft) |
| 1×6 or 1×8 boards (for walls/roof) | 10 pieces (8 ft) |
| 14-gauge galvanized wire mesh (1-inch holes) | 25 sq ft |
| Corrugated metal or asphalt shingles (roof) | 1 sheet/bundle |
| Wood screws (2–3 inches) | 1 lb box |
| Hinges and latch | 2 hinges, 1 latch |
| Staples or fence staples | 1 box |
| Optional: non-toxic wood sealant | 1 quart |
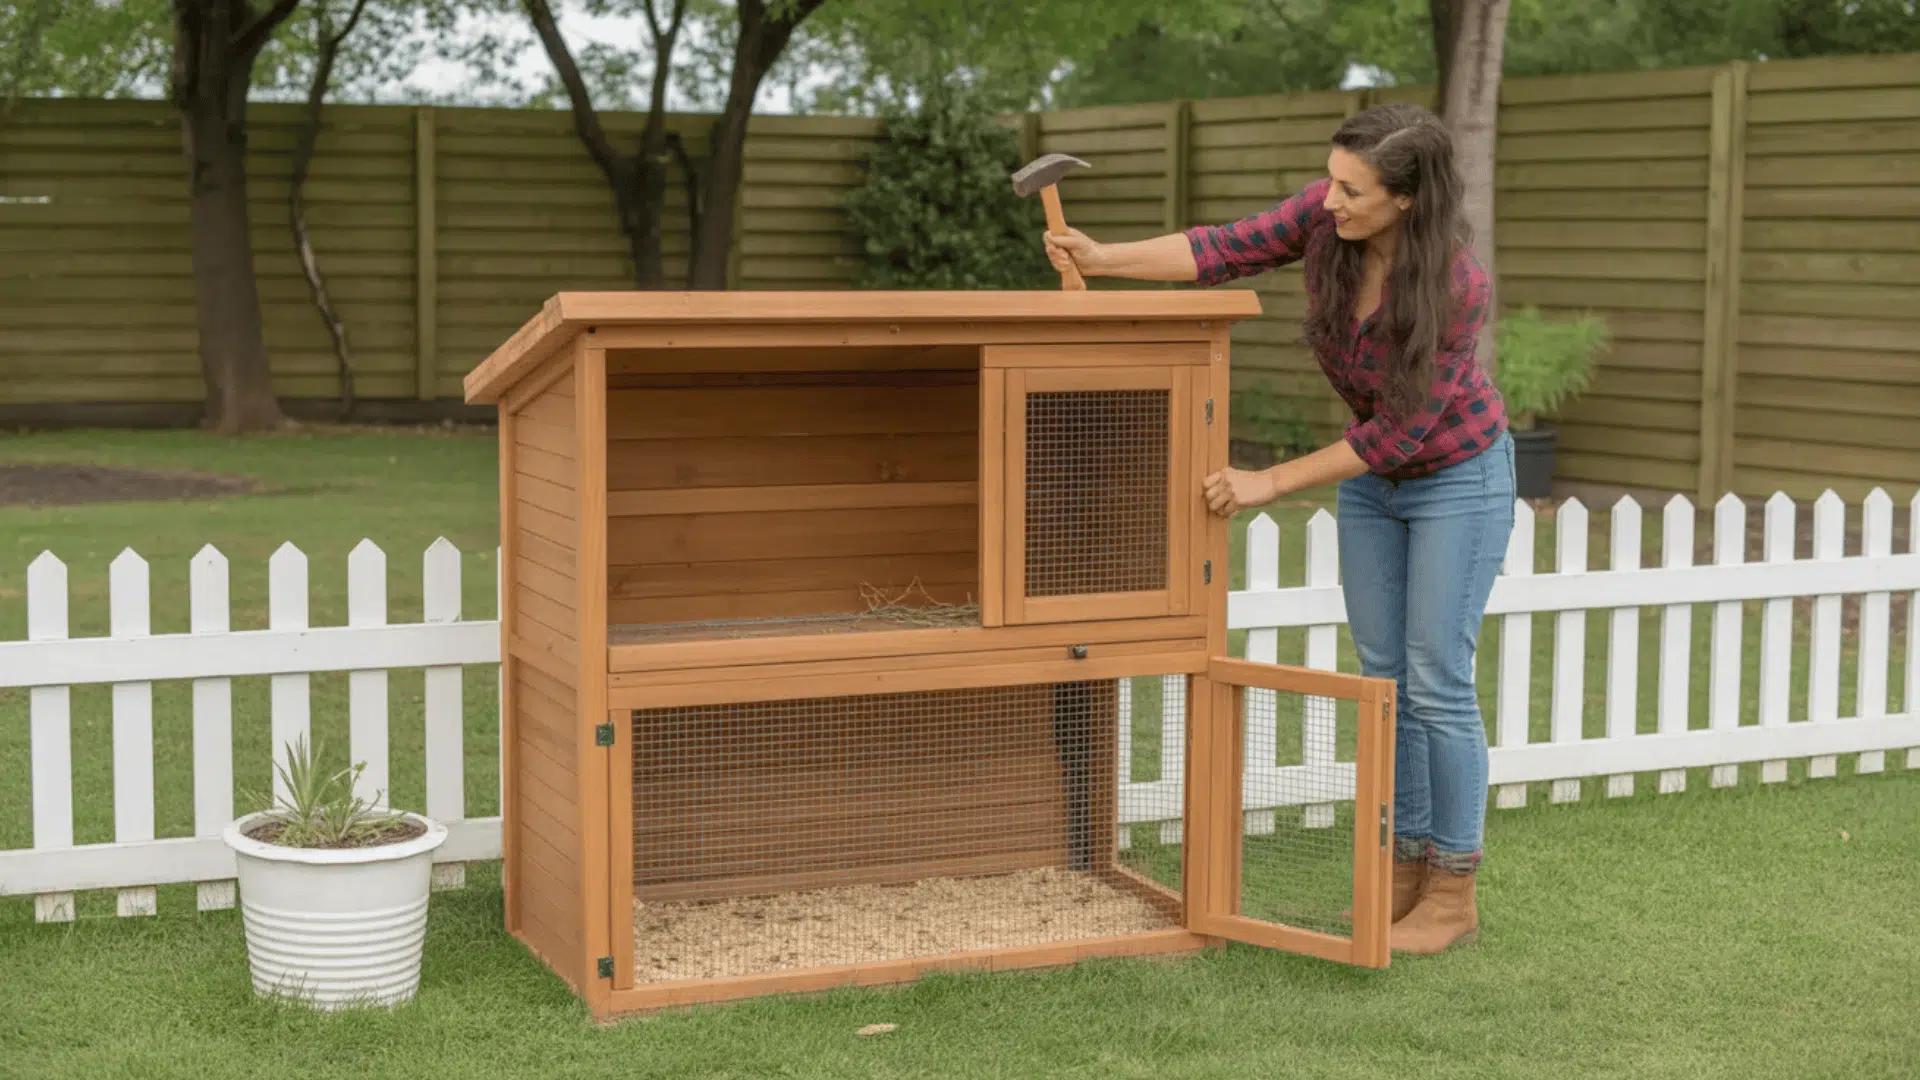
Building a DIY Rabbit Hutch: Easy Steps
This beginner-friendly plan builds a rectangular hutch with an elevated base, wire floor, and solid roof. Work in a flat area and wear safety glasses. Take one step at a time.
Step 1: Cut the Frame Pieces

Start by measuring and cutting your 2-by-4 lumber accurately.
You need four 4-foot pieces for the top and bottom rails, four 4-foot pieces for the vertical legs, and four 2-foot pieces for cross braces to add strength.
Lay everything out flat and label each piece clearly. Double-check all measurements with a tape measure before making any cuts to avoid wasting wood.
This step sets a solid foundation for the rest of the build.
Step 2: Assemble the Base Frame
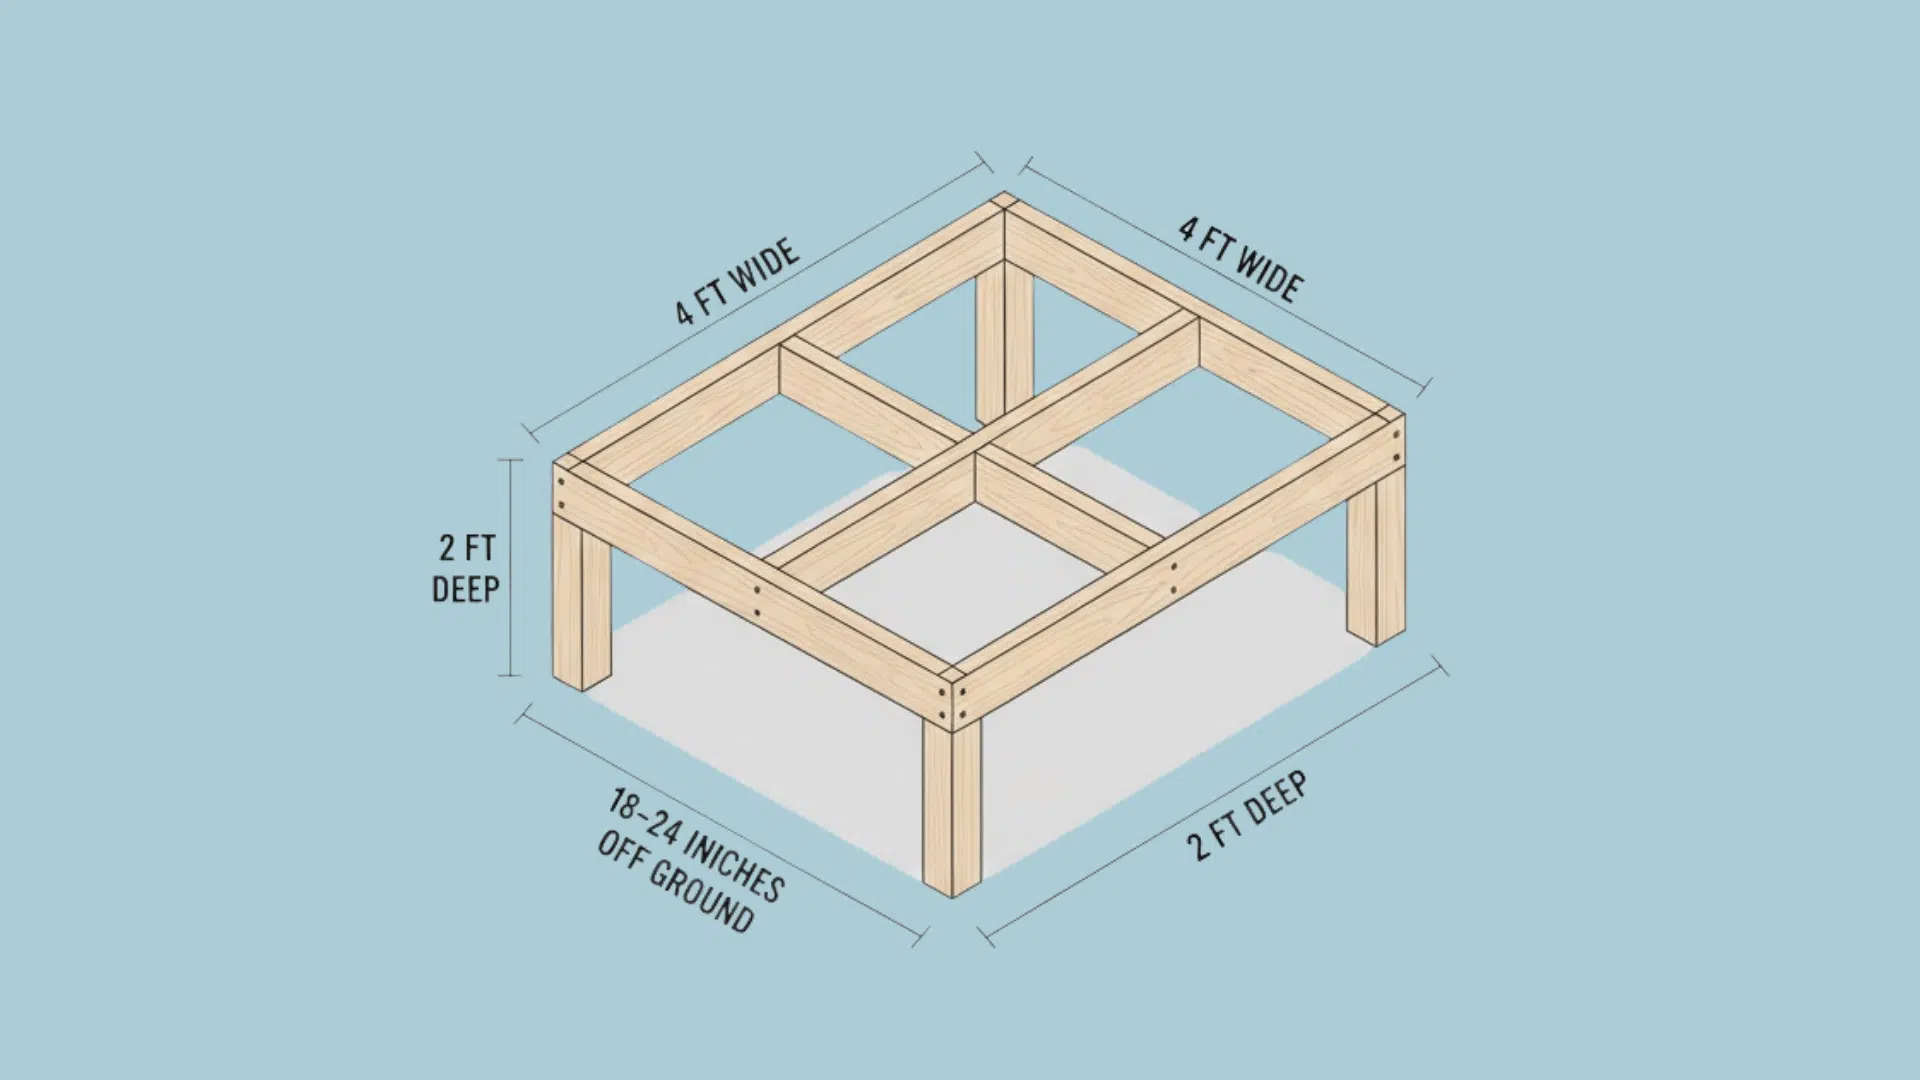
Form a rectangle with the bottom rails by screwing the corners together using 3-inch wood screws.
Attach the four vertical legs at each corner so the base sits 18-24 inches off the ground.
This keeps rabbits safe from predators and moisture. Add the cross braces in the middle and screw them securely.
Check that the frame is square by measuring diagonals; they should match exactly.
Step 3: Build the Walls and Attach Wire Mesh
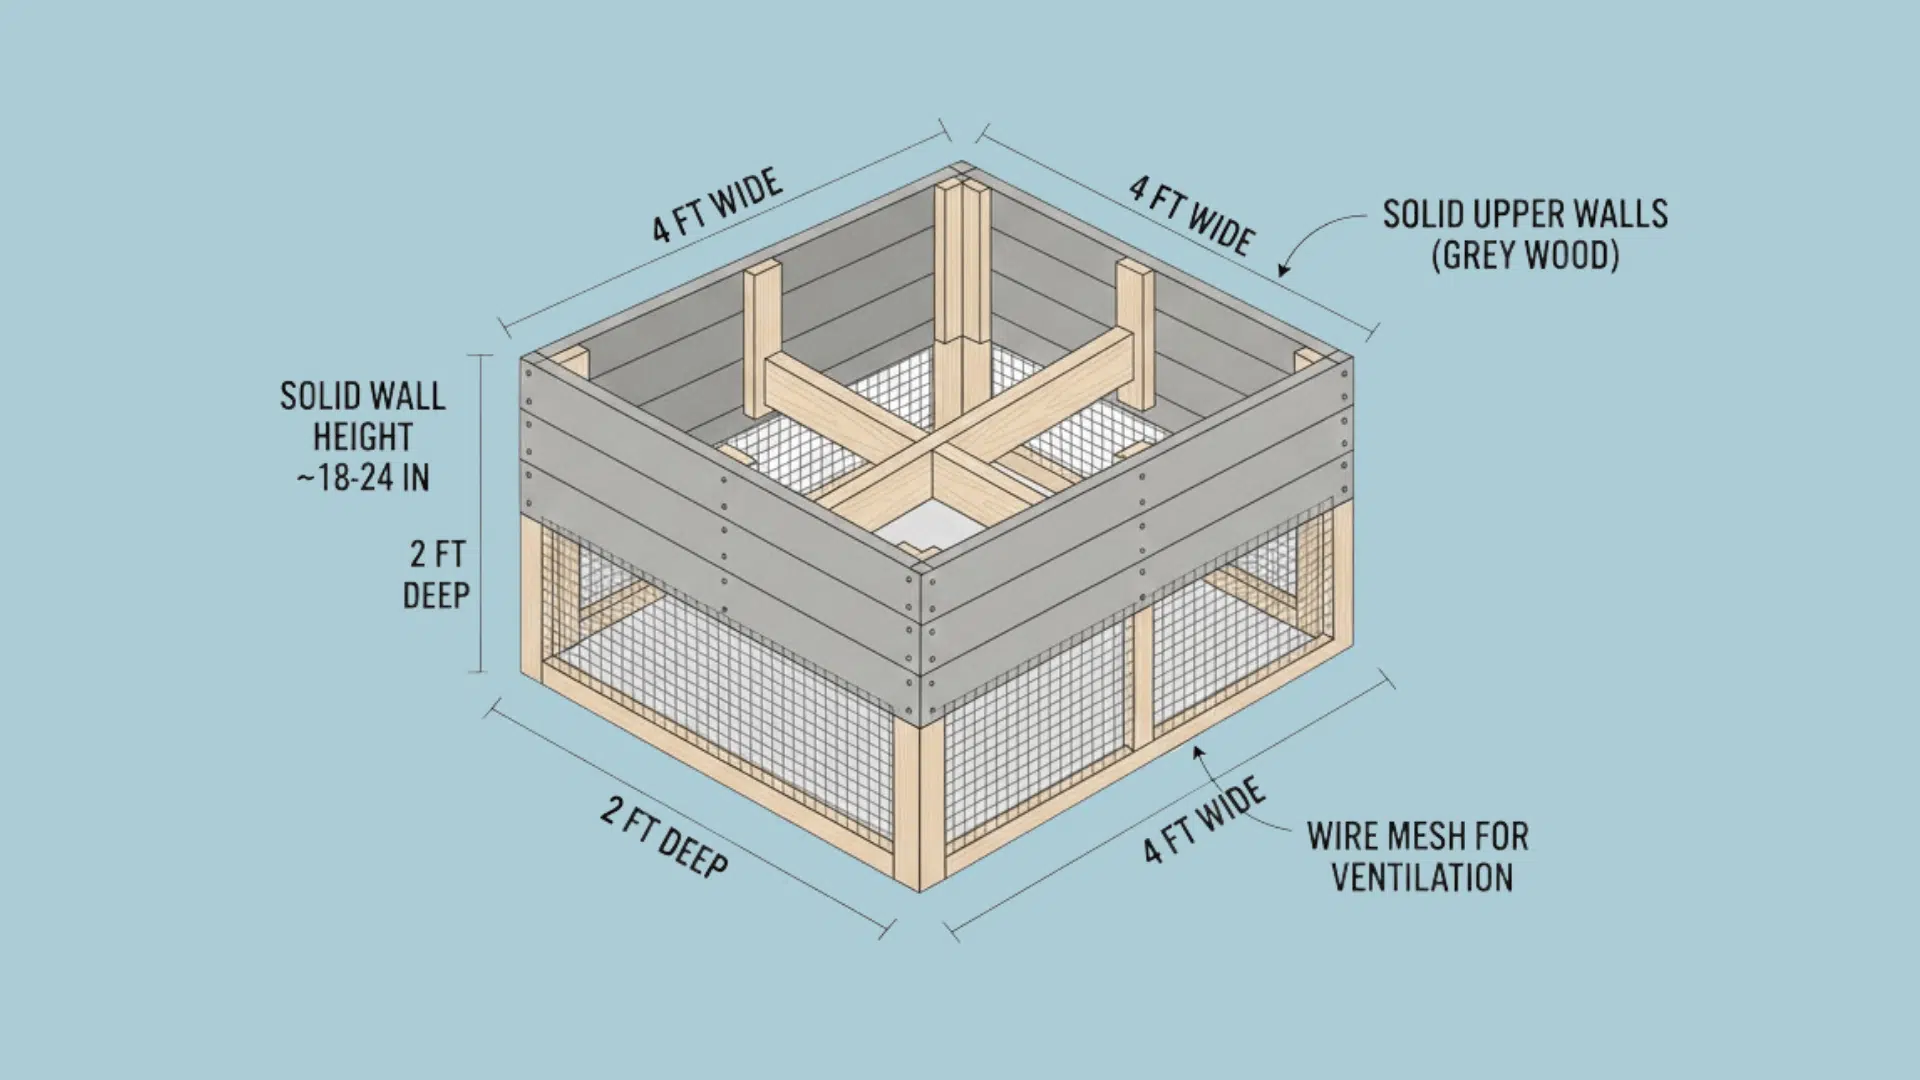
Frame the back and side walls using 1×6 boards for the upper half to provide shelter and privacy.
For the lower half and front, staple 14-gauge galvanized wire mesh (1-inch holes) tightly to the frame using fence staples every few inches.
This allows excellent ventilation and visibility while preventing escapes.
Make sure no sharp wire edges point inward. Either bend it or cover it for rabbit safety.
Step 4: Add the Roof and Doors
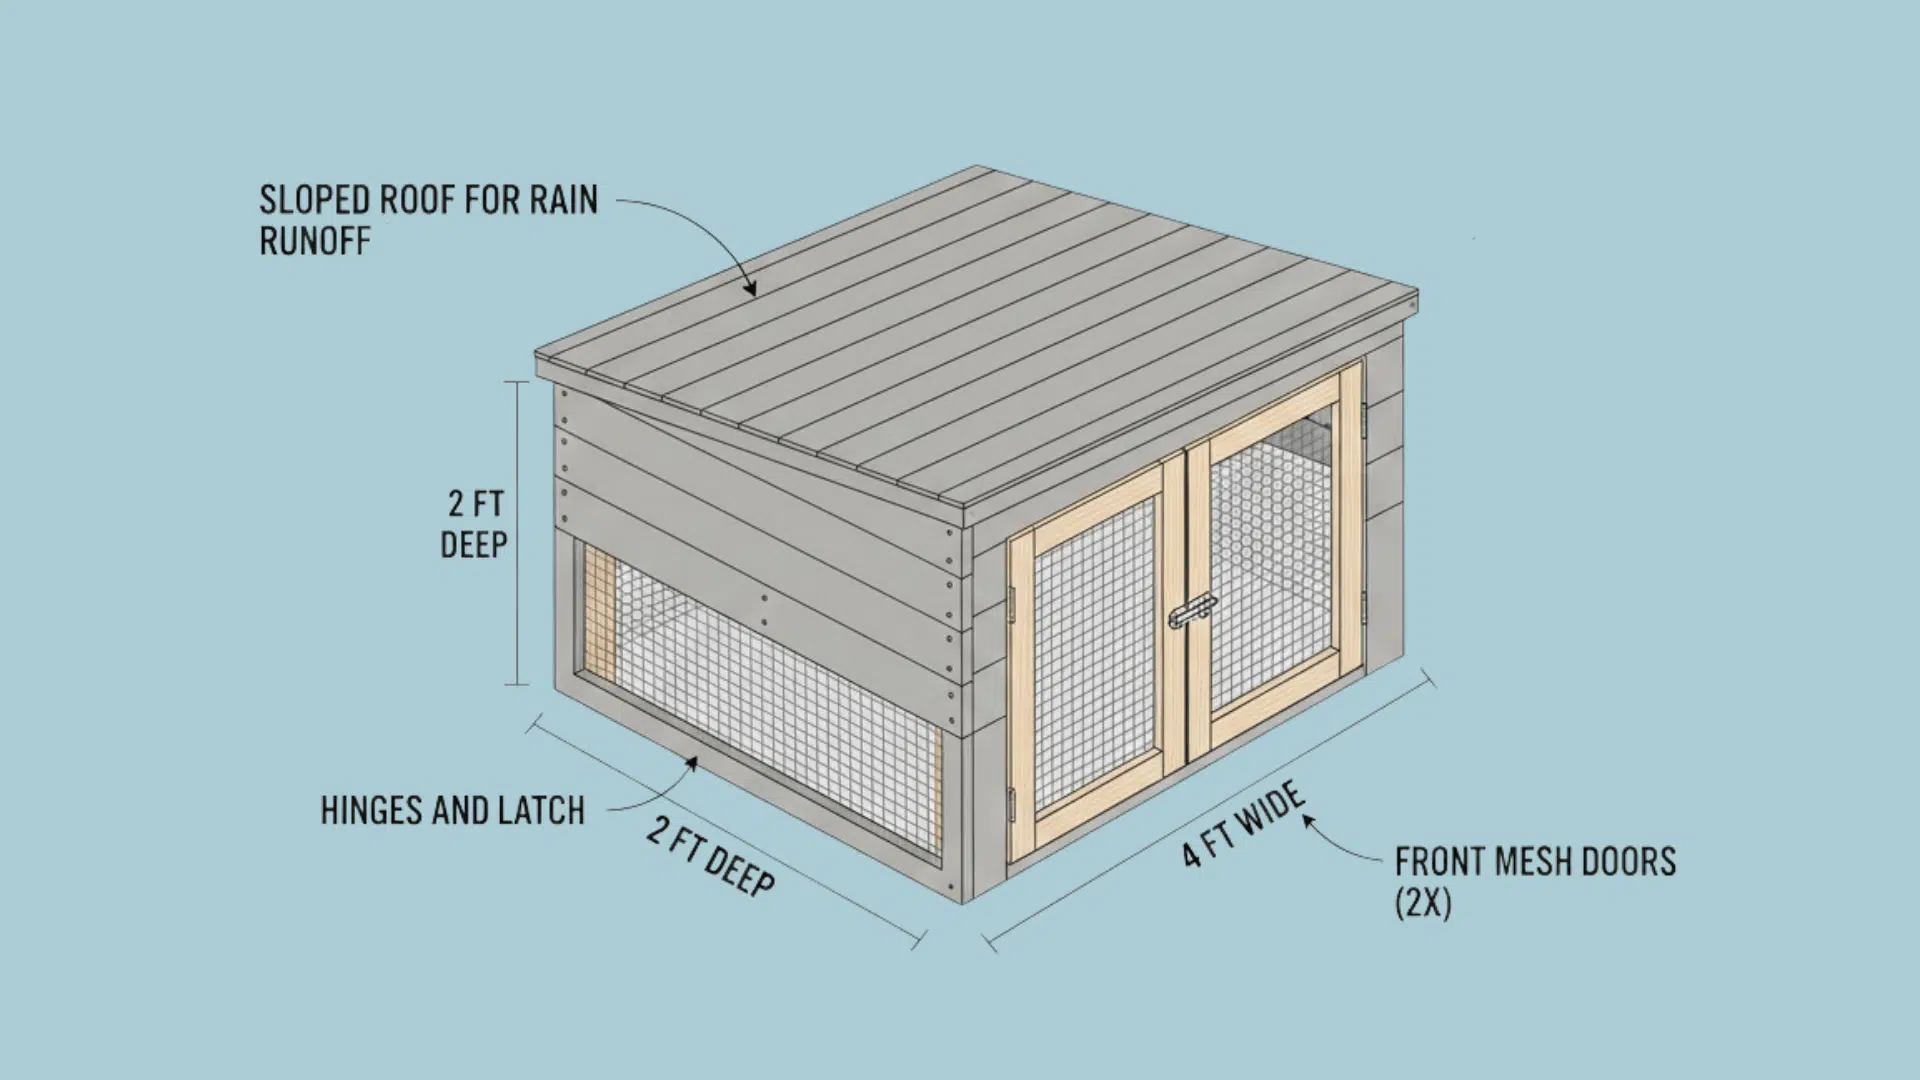
Create a sloped roof by attaching 1×6 boards or a corrugated metal sheet to the top frame, overlapping the edges slightly to shed rain.
Build two simple door frames from 1×6 lumber, cover them with mesh, then attach them to the front with hinges. Install a sturdy latch to keep doors secure.
Test the doors for smooth opening and closing before moving forward.
Step 5: Finish and Check Safety
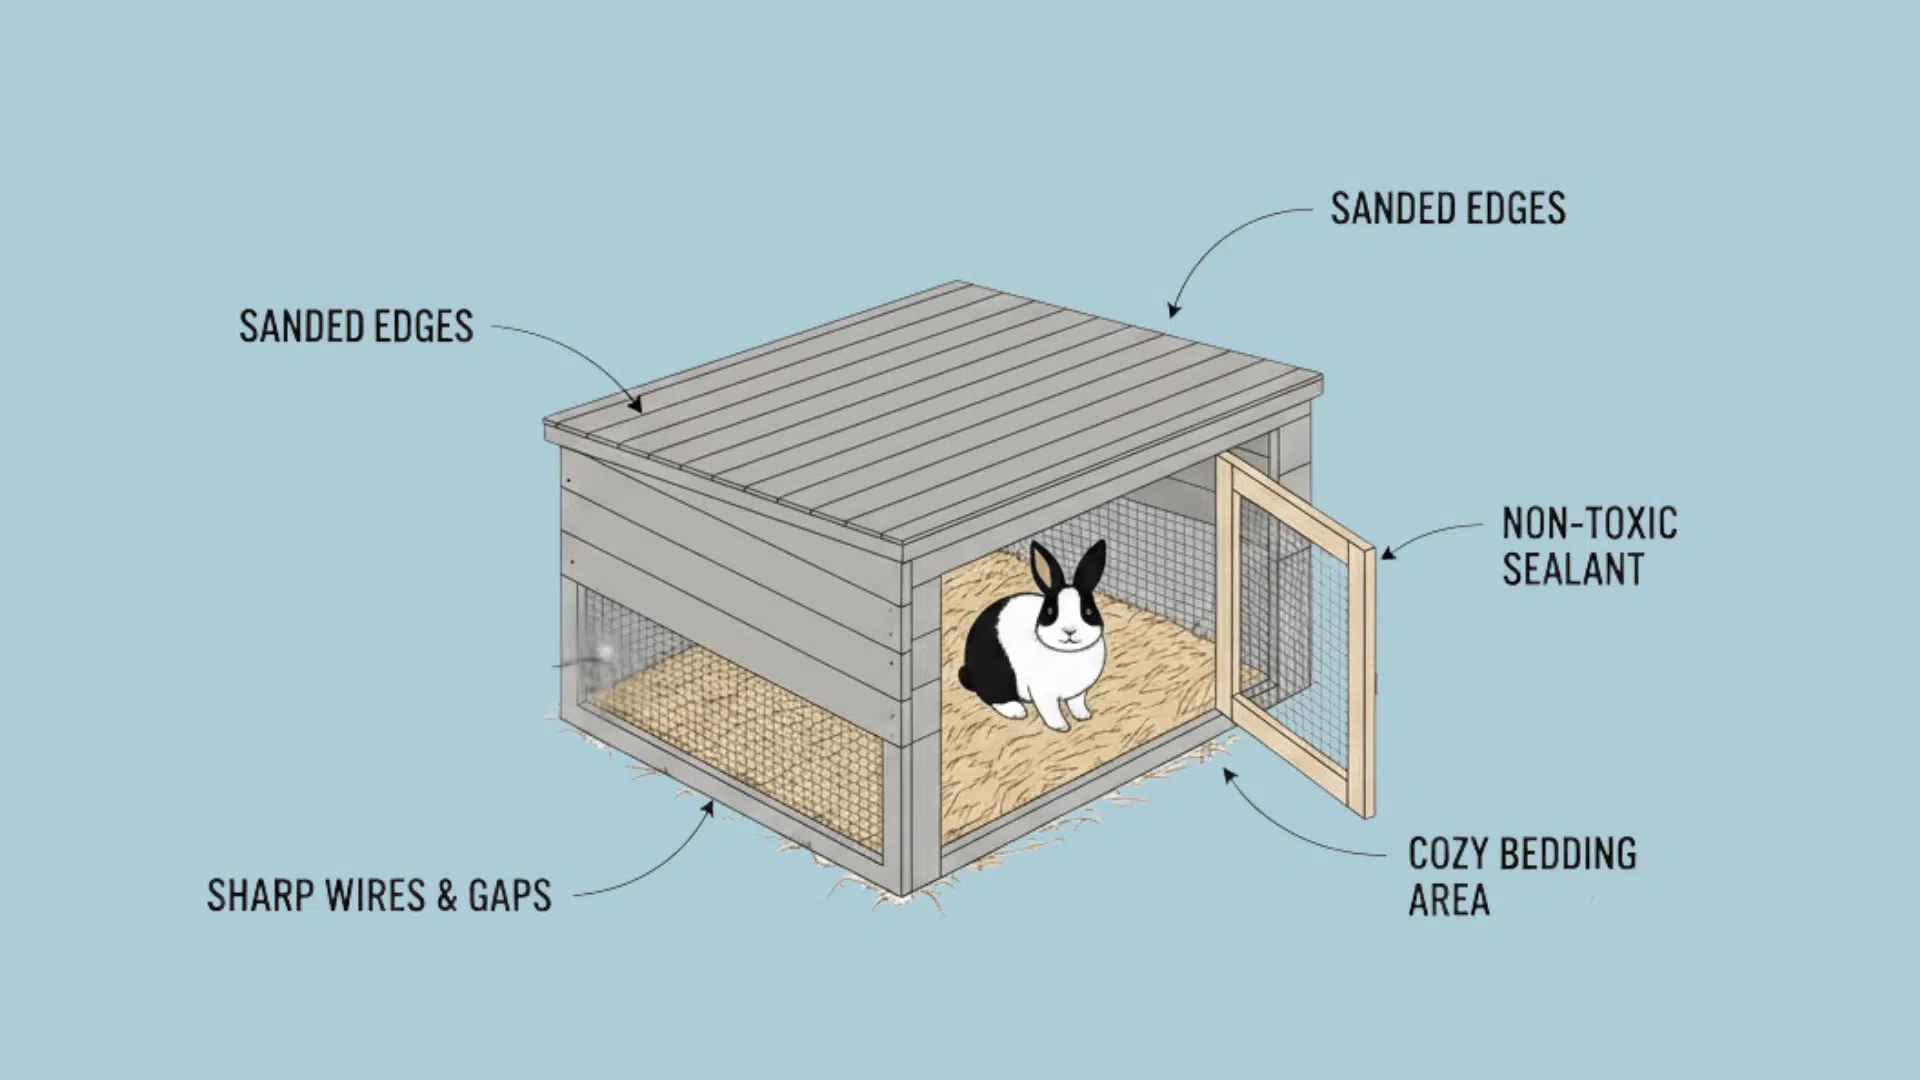
Sand any rough edges or splinters to protect your rabbit’s skin. Apply a non-toxic, rabbit-safe wood sealant if desired for extra weather protection.
Inspect the entire hutch and check for loose screws, sharp wires, or gaps larger than 1 inch. Add a sheltered bedding area inside.
Remember to test for stability by giving it a gentle shake to ensure everything stays in place.
Tips to Maintain Your DIY Rabbit Hutch
Keep your DIY rabbit hutch clean and safe year-round with simple daily and weekly routines. Regular care protects your rabbits from illness and weather damage.
- Daily Spot Cleaning: Remove droppings and leftover food to keep the hutch clean
- Fresh Water Check: Refill water bottles daily to ensure constant access
- Bedding Care: Remove wet bedding promptly to prevent mold buildup
- Weekly Deep Cleaning: Clean floors and walls using a mild vinegar solution
- Safety Inspection: Check wire mesh and doors regularly for damage or gaps
- Ventilation Check: Ensure proper airflow inside the hutch to prevent moisture buildup and respiratory issues
- Parasite Monitoring: Check fur and bedding regularly for signs of mites, fleas, or other pests
Conclusion
Building a DIY rabbit hutch is a practical way to create a safe and comfortable space for your rabbits. It also helps reduce costs compared to many store-bought hutches.
Following the steps above makes it easier to build a sturdy hutch that supports good airflow, safety, and easy cleaning.
A well-kept hutch also helps rabbits stay healthy and active by providing a clean, dry, and comfortable environment where they can rest, move, and behave naturally.
Beginners can start with a simple design and improve the setup over time.
With basic tools and materials, creating a reliable rabbit hutch becomes much easier.
Have you built a rabbit hutch before? Share tips or photos of your setup in the comments to help other rabbit owners.
Frequently Asked Questions
How Long Does It Take to Build a DIY Rabbit Hutch?
Most DIY rabbit hutch builds take about 4 to 8 hours, depending on skill level, tools available, and design complexity.
What Bedding Works Best Inside a DIY Rabbit Hutch?
Soft, absorbent bedding, such as aspen shavings, paper-based pellets, or fresh hay, helps keep rabbits dry, clean, and comfortable.
How Can I Make the Hutch More Fun For My Rabbit?
Add raised platforms, chew toys, tunnels, and hiding boxes to encourage movement, natural behavior, and mental stimulation.