

Bringing an axolotl home is an exciting moment that quickly shifts into careful responsibility.
That first look at an empty aquarium often brings a sense of awareness that this setup needs more thought than expected.
Axolotls are among the most environmentally sensitive amphibians kept in captivity, and the conditions you create from day one have a direct impact on their long-term health.
These unique creatures depend on cool, calm water and stable conditions that are very different from standard aquariums.
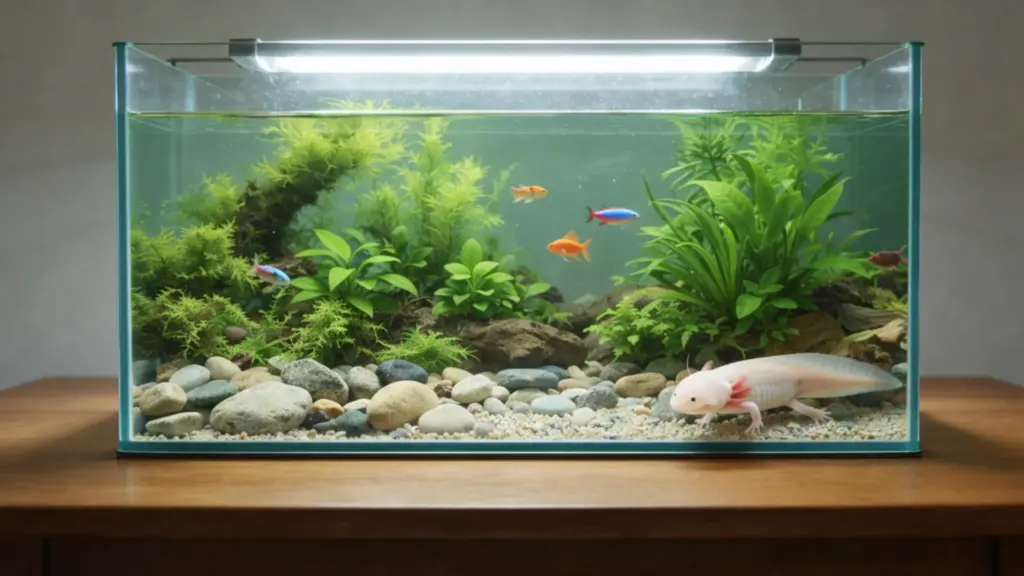
An axolotl aquarium is not just a container but a living space that needs stability and care from the first day, such as temperature control or decor selection, to ensure the axolotl feels comfortable.
When the surroundings feel natural and consistent, the tank becomes easier to manage and far more enjoyable to maintain, turning routine care into a calming and rewarding part of daily life.
What is an Axolotl Tank and Why Does Setup Matter?
Axolotls (Ambystoma mexicanum) are neotenic salamanders, meaning they retain their larval, fully aquatic form throughout their entire lives and never metamorphose into land-dwellers.
Strong filters, bright lights, and warm water that work for tropical fish can cause stress or health issues for axolotls.
Axolotls are cold-water species most comfortable between 60–68°F (16–20°C).
Axolotl tank is a carefully controlled aquarium designed to meet the unique needs of axolotls, which are cold-water amphibians and not typical aquarium pets.
Unlike most fish tanks, an axolotl aquarium focuses more on floor space than height, as axolotls spend most of their time at the bottom.
Proper axolotl tank setup matters because poor tank conditions can lead to infections, appetite loss, and shortened lifespan, especially in unstable or poorly maintained aquarium environments.
In my practice, one of the most common axolotl health calls I receive involves owners who didn’t realize how quickly warm water suppresses gill function.
Axolotls absorb oxygen through their gills and permeable skin, both of which are extremely vulnerable to temperature spikes and poor water chemistry.
What You Need Before Setting Up an Axolotl Tank?
Preparing only the essentials before setting up an axolotl aquarium keeps the process simple, safe, and easier to manage. The setup relies on a minimal but purposeful selection of materials.
- Fine aquarium sand suitable for axolotls
- Basalt or similar sturdy rocks and gravel for the retaining wall
- Aquarium filter capable of gentle, adjustable flow
- Pipe or tubing to disperse filter output evenly
- Aquatic plants, moss, ferns, and aqua soil
- A colander for refilling water without disturbing the substrate
Step-by-Step Axolotl Tank Setup Guide
From building a stable base that protects the glass to managing water flow and selecting plants that thrive without creating hazards, each stage plays a role in long-term tank balance.
Step 1: Build a Safe Base and Retaining Wall
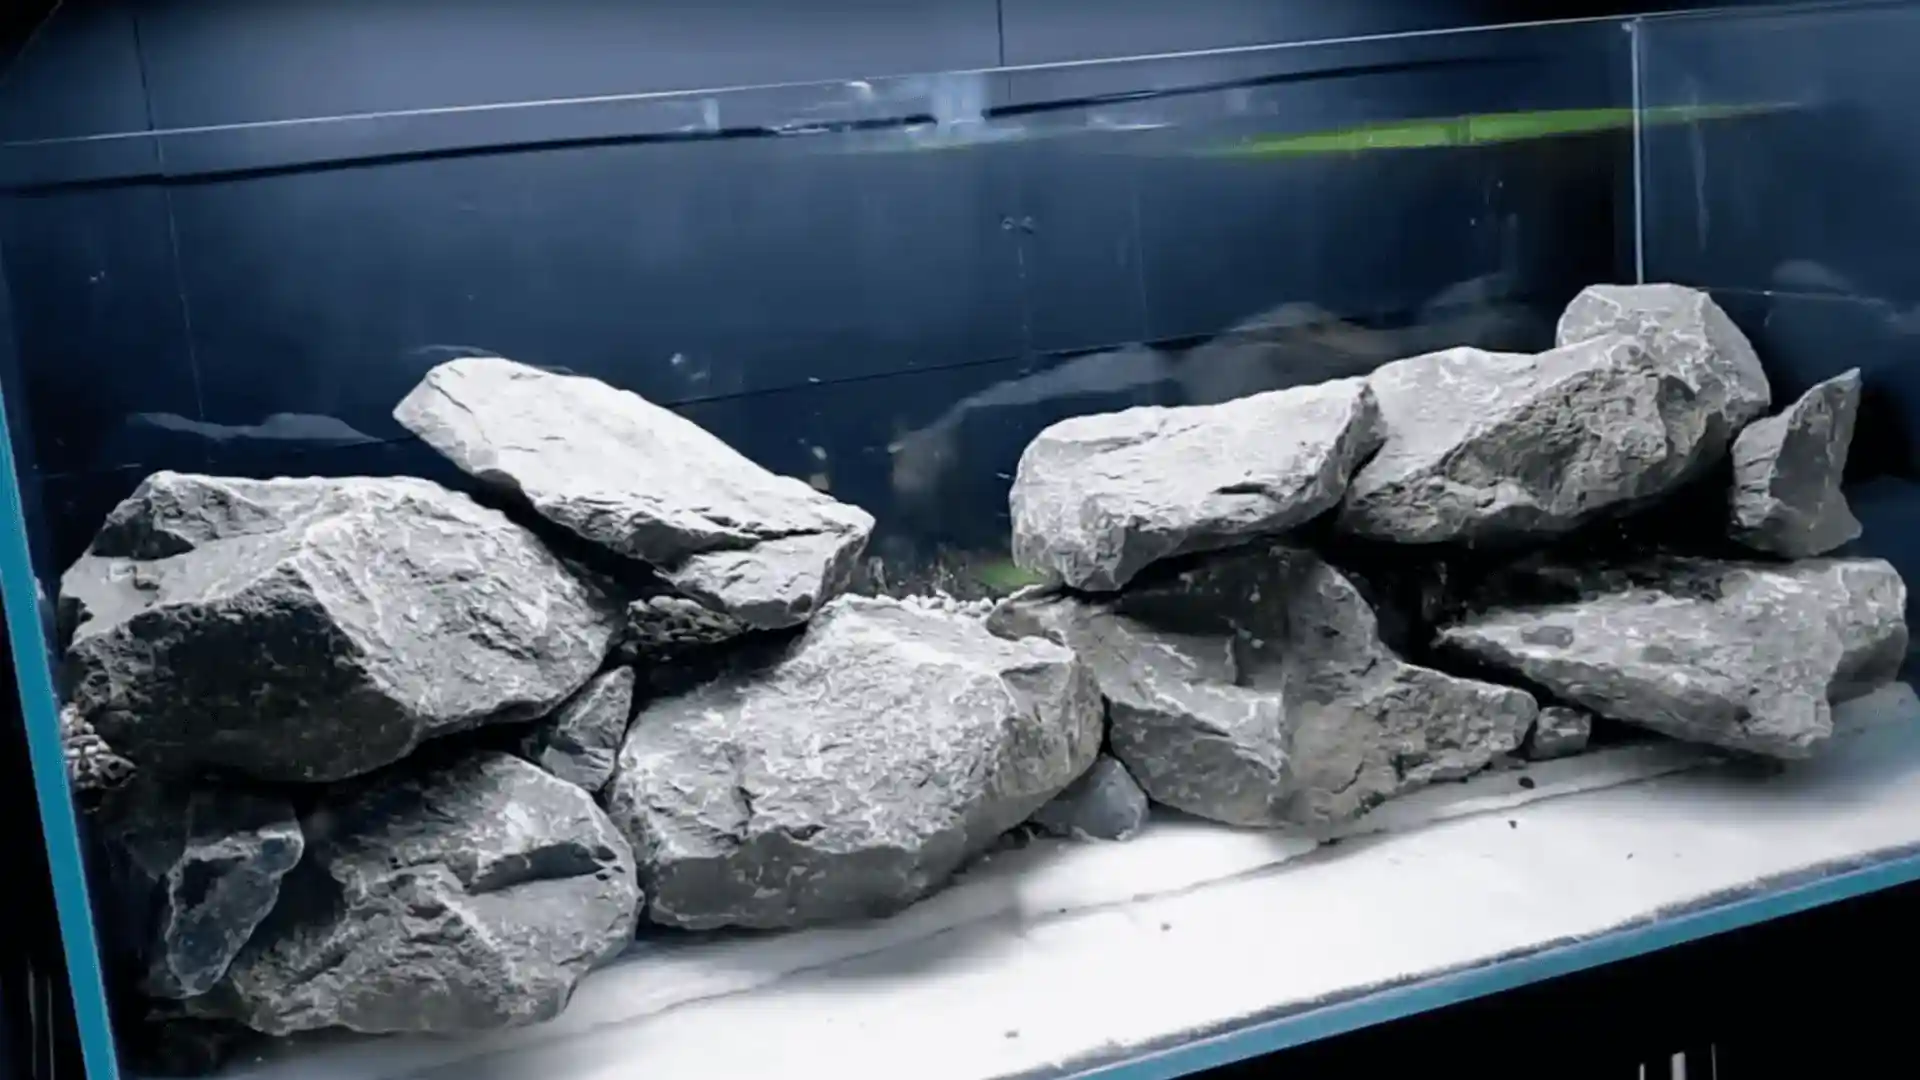
The axolotl tank setup begins with careful substrate planning to support heavy materials without stressing the glass base.
Large basalt rocks are selected to create a retaining wall at the back, but instead of placing them directly on gravel, a layer of foam is added first to absorb pressure.
Gravel is then layered over the foam, forming a cushioned foundation that distributes weight.
Rocks are stacked gradually, interlocking each layer to build height while maintaining stability and long-term structural support.
Step 2: Shape the Hardscape
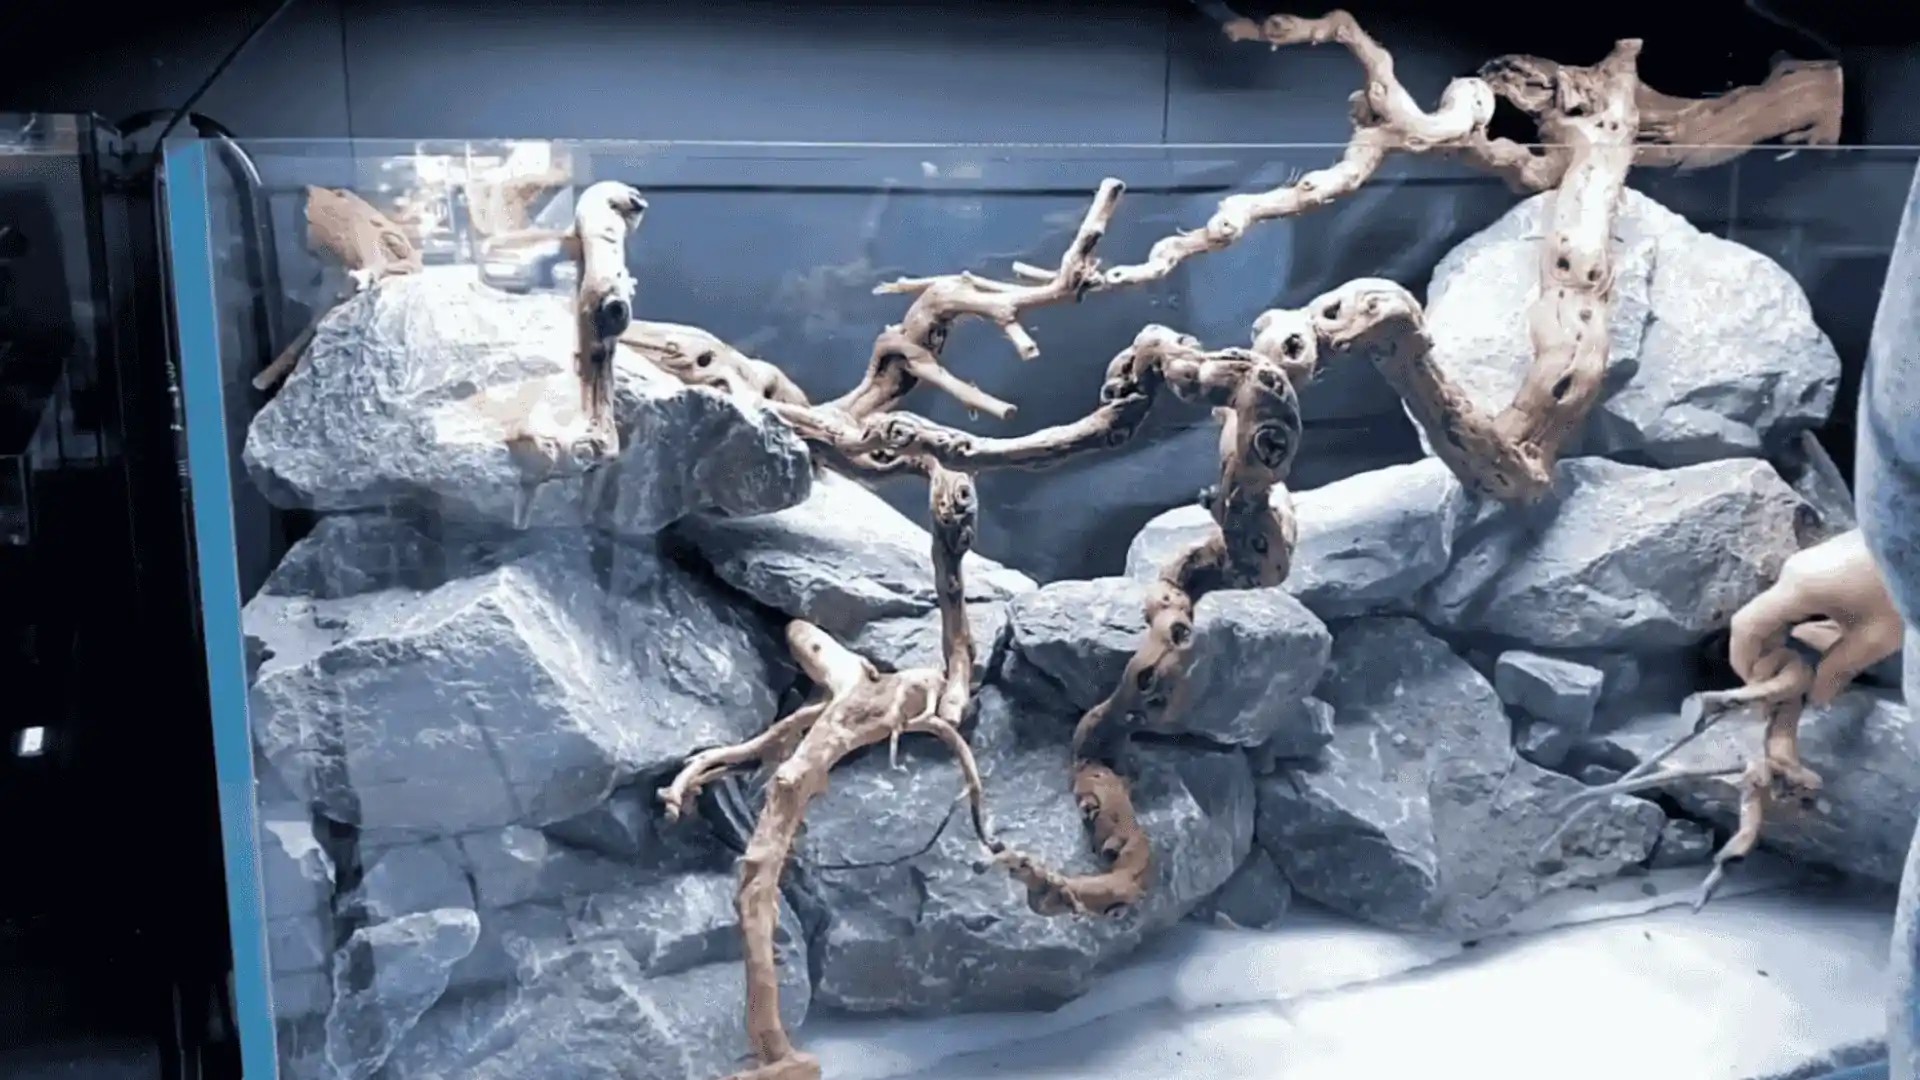
Once the main wall feels stable, extra stones are added in the axolotl aquarium behind it to reinforce the structure and prevent shifting over time.
Driftwood is placed on top and adjusted until the balance and visual flow feel natural, after which the layout is finalized and visually complements the overall aquascape.
One lower corner of the wall is intentionally left clear of gravel, allowing water to circulate behind the rocks and into the filter.
Fine sand is added to the foreground, avoiding gravel entirely to reduce swallowing risks.
Step 3: Fill the Tank and Modify Water Flow
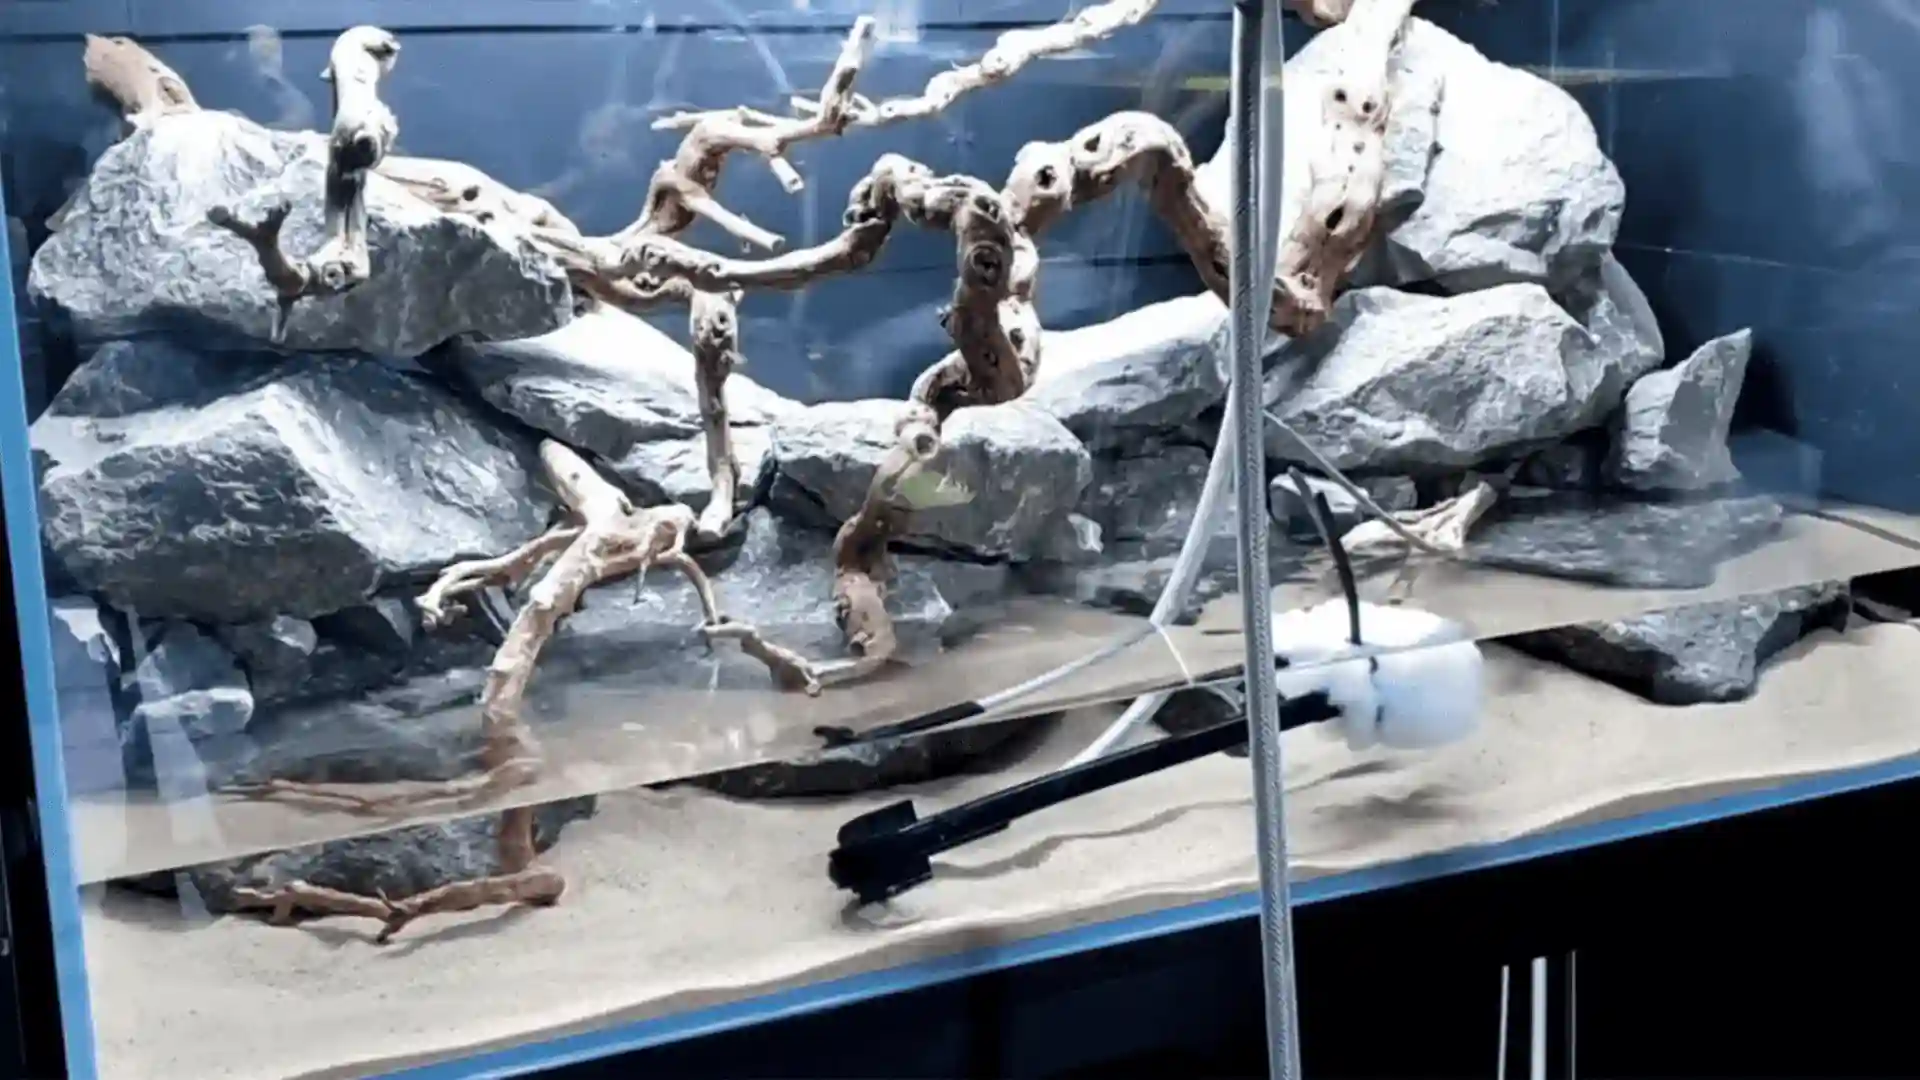
Water is added gradually until it rises above the filter intake, confirming that circulation behind the retaining wall works correctly.
After observing the flow, the filter outlet is modified using a pipe fitted along the rock face, sealed at one end, and drilled with evenly spaced holes.
This adjustment spreads water across the axolotl tank rather than forcing a single strong stream.
Moss is placed in splash zones to wick moisture downward while softening the appearance of exposed rock surfaces.
Step 4: Add Moss and Emergent Plants

Moss selection is based on moisture levels throughout the tank, with cushion moss placed in lightly damp areas and traditional moss used where water exposure is higher.
Over time, the moss naturally creeps across the rocks and anchors itself securely.
Ferns are prepared by removing excess soil from their roots, then wrapped in small filter floss pouches that retain moisture without oversaturation.
Ivy is added using the same method, allowing roots to stay hydrated while leaves grow upward.
Step 5: Plant the Aquatic Zone
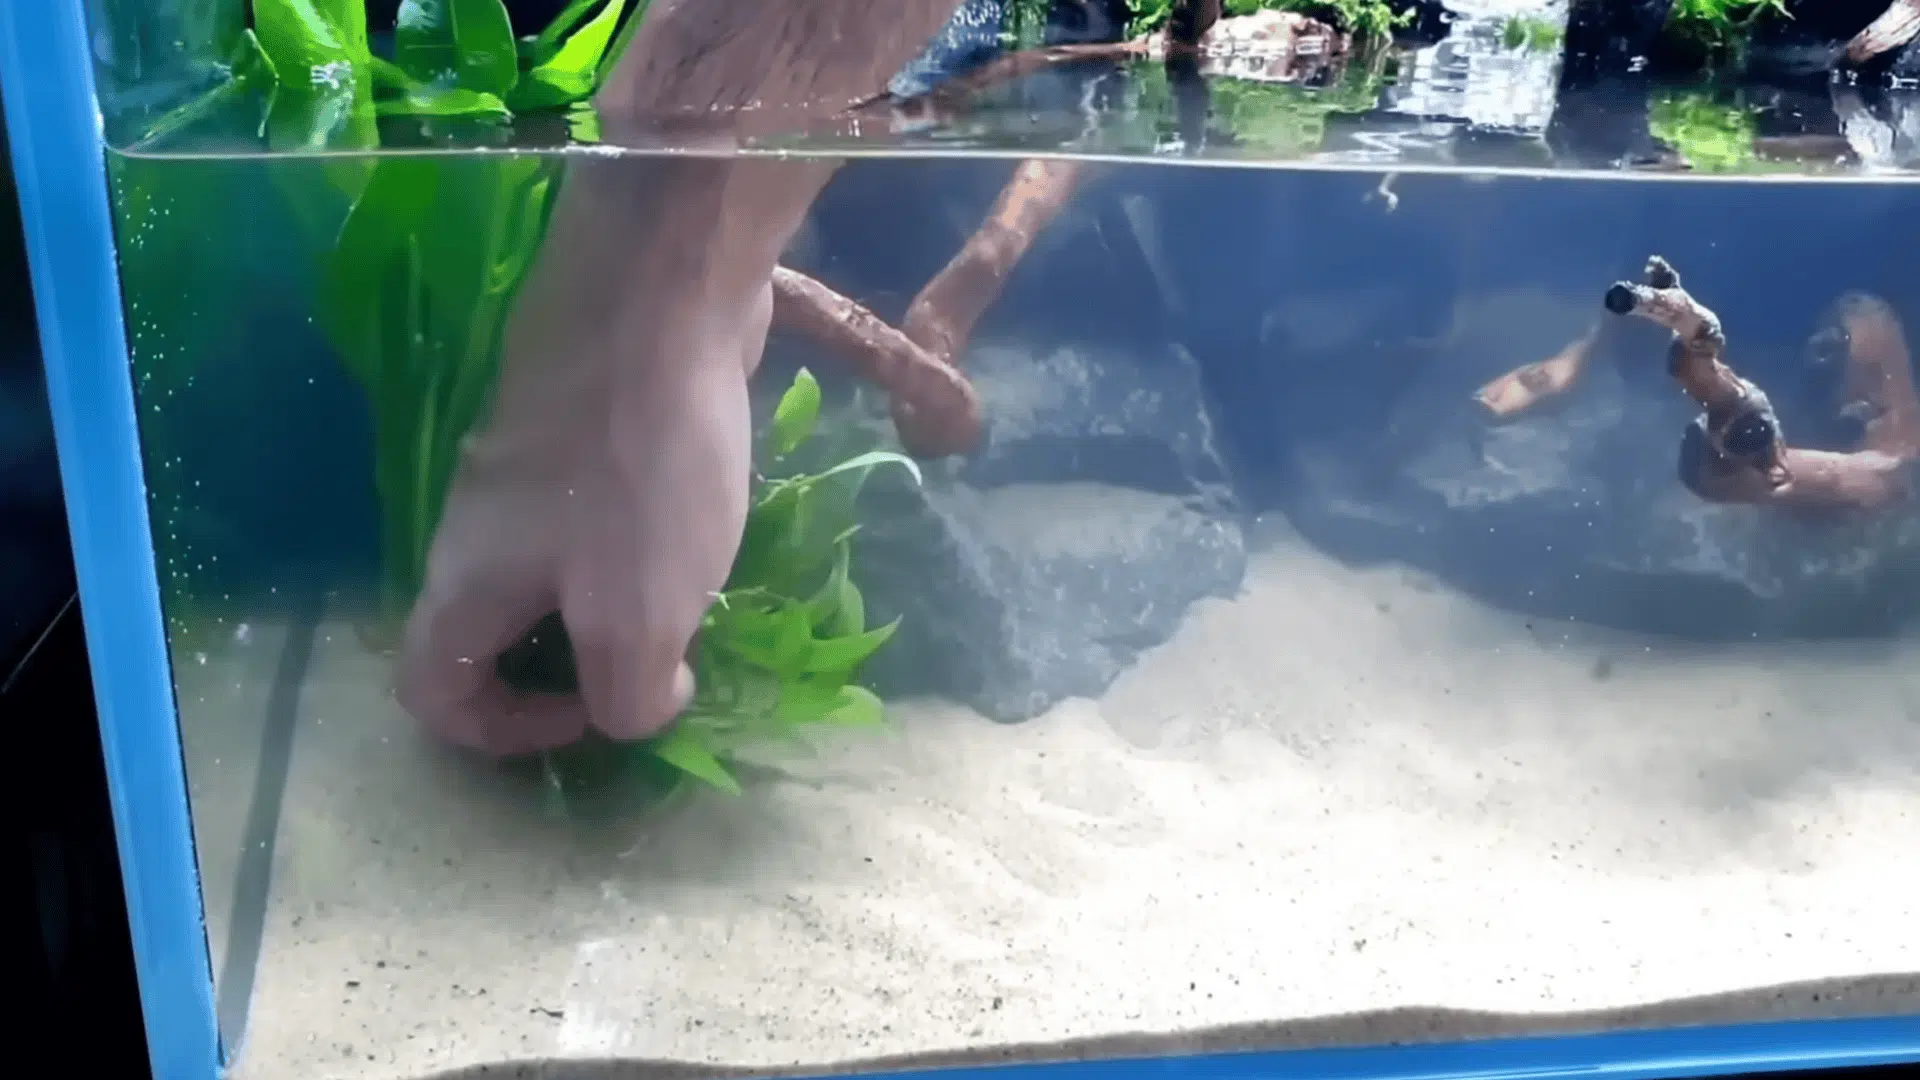
A deep layer of aqua soil is poured into the rear section, where no rocks were placed, creating a nutrient-rich zone for aquatic plants with emergent growth.
Foreground plants are positioned carefully, pushed deep into cracks near the rocks to prevent disturbance caused by axolotl movement along the glass.
Root tabs are added beneath sand-planted species in an axolotl aquarium to support steady growth.
Anubias and Bucephalandra are glued directly onto stones during the axolotl tank setup since they draw nutrients from the water column.
Step 6: Introduce the Axolotl and Maintain Balance
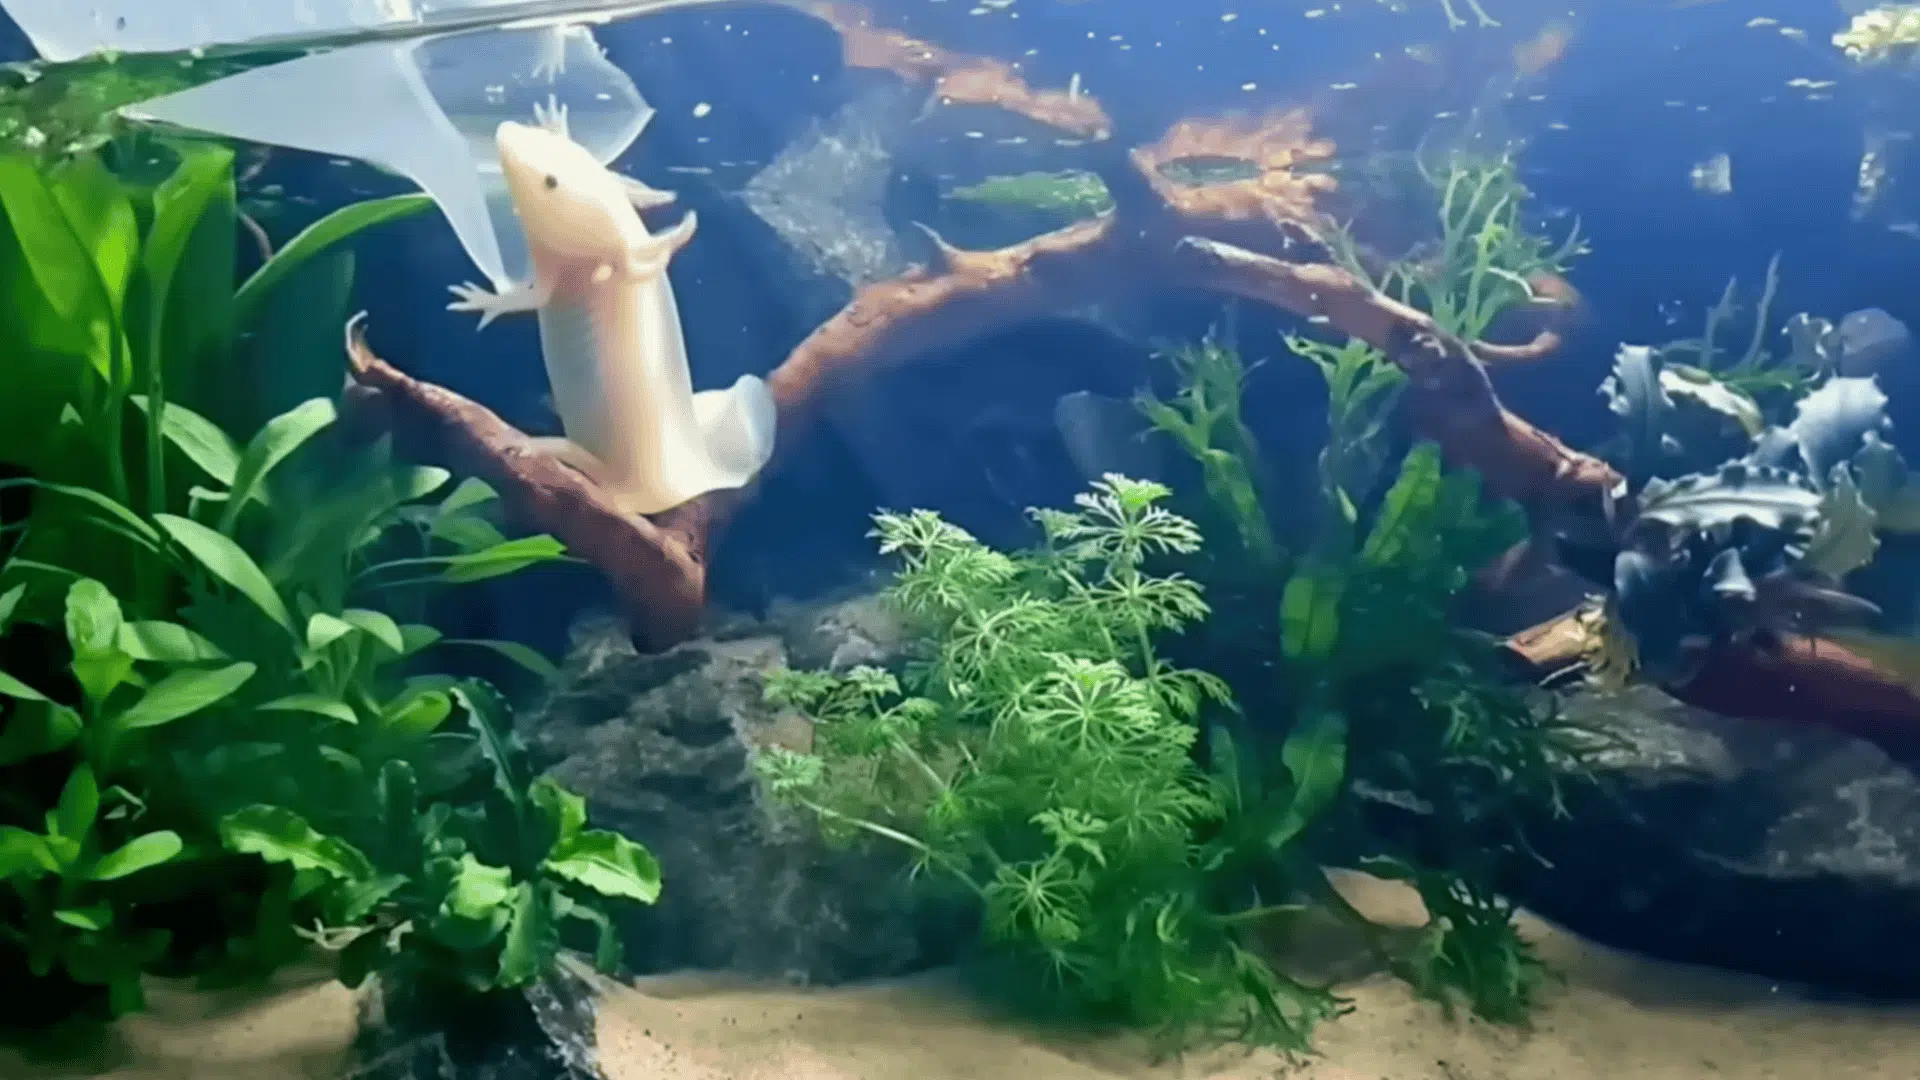
After planting and ensuring that water flow is fully stabilized, the axolotl is introduced into the tank, where natural cover from plants and hardscape helps reduce stress.
Pearl danios are added as dither fish, encouraging natural ambush behavior without posing safety concerns.
Over several weeks, plant growth increases dramatically while a temporary diatom phase appears, which is normal in new setups.
Light cleaning, controlled water changes, and careful refilling keep the system balanced.
This tutorial is based on a helpful video by MD Fish Tanks. You can check out the original video on their YouTube channel here or watch it below.
Choosing a Safe Substrate for an Axolotl Tank
In an axolotl tank set up, fine sand or a bare bottom are the safest substrate options, as both reduce the risk of swallowing and internal injury.
Gravel should be avoided because axolotls feed in a vacuum-like motion; they don’t bite, they inhale.
Axolotls are capable of accidentally swallowing particles more than twice the width of their own head.
Ingested gravel that cannot pass through the digestive tract causes impaction, which is a veterinary emergency requiring sedation and manual extraction, or in severe cases, surgery.
Decorations in an axolotl aquarium should mimic a natural habitat using smooth rocks, soft plants, and safe driftwood that does not have sharp edges.
Hiding spots such as caves, tunnels, or shaded areas help axolotls feel secure and reduce stress. Artificial or live plants with soft leaves work well for cover.
Any small, sharp, or loose objects should be avoided, as they can cause injury or block digestion, making the tank unsafe.
How to Cycle Your Axolotl Tank Properly?
Cycling the tank is an essential step that prepares the water to safely support an axolotl.
During an axolotl tank setup, cycling allows beneficial bacteria to grow and break down harmful waste like ammonia.
To complete the nitrogen cycle, set up the tank with a filter, add an ammonia source, and test the water regularly to track ammonia, nitrite, and nitrate levels.
Over time, ammonia drops, nitrites rise and fall, and nitrates appear, showing progress.
An axolotl aquarium is ready only when ammonia and nitrite levels reach zero consistently.
Common mistakes include rushing the process, skipping water tests, or adding the axolotl too soon. Patience and regular testing help fix these issues and ensure a stable, safe environment.
Cooling Your Axolotl Tank: What to Do When Temperatures Rise
This is one of the most underaddressed challenges in axolotl keeping, particularly in warmer climates or during summer months.
Unlike tropical fish, axolotls cannot adapt to warm water temperatures sustained above 72°F, which can suppress their immune system and be fatal within days.
- Clip-on evaporation fan: The simplest and cheapest solution, positioned to blow across the water surface, it drops the temperature by 2–5°F through evaporation.
- Frozen water bottles: Float sealed bottles of frozen water in the tank to bring temps down quickly during heat spikes, a short-term fix only.
- Aquarium chiller: The most reliable long-term solution for owners in warm climates. Expensive upfront, but it removes the daily stress of temperature management entirely.
- Room AC: Keeping the room consistently below 72°F is often sufficient if your home is climate-controlled.
Always keep a digital thermometer in the tank and check it daily. Water temperature changes more slowly than air, so you won’t notice a dangerous rise until it’s already happened.
How to Maintain and Clean an Axolotl Tank?
When changing water, always use dechlorinated water and pour it slowly to avoid disturbing the substrate or stressing the axolotl.
Chlorine and chloramines present in most tap water burn gill filaments and damage permeable skin on contact.
A dechlorinator like Seachem Prime neutralizes these instantly and also temporarily detoxifies ammonia during emergency situations.
Weekly tasks should include removing waste, uneaten food, and changing a small portion of water to keep the tank clean and balanced.
Monthly cleaning can focus on deeper checks like rinsing filter media with tank water and wiping algae from glass.
Decorations should be gently scrubbed without soap, and equipment like filters and thermometers should be checked regularly.
Remove uneaten food within 2–3 hours of every feeding. Decaying food releases ammonia rapidly and can trigger fungal outbreaks, one of the most common axolotl health issues I see.
Following a proper tank cleaning routine ensures you cover every step without missing anything that could affect water quality over time.
Tips to Keep an Axolotl Healthy in a Tank
Keeping an axolotl healthy goes beyond the initial axolotl tank setup. Daily care, observation, and environment management all play a role in long-term well-being.
- Feeding routines and diet basics: A consistent feeding schedule with nutrient-rich foods supports healthy growth and digestion. Offer sinking carnivore pellets, earthworms, or frozen bloodworms.
- Recommended lighting setup: Axolotls prefer low lighting, so a tank should use soft, indirect light rather than bright aquarium LEDs. A photoperiod of 8-10 hours mimics natural day/night cycles and supports both plant growth and axolotl comfort
- Signs of stress or poor health: Curled gills, reduced activity, or loss of appetite often indicate stress caused by water quality.
- Creating a calm and safe environment: Low lighting, minimal noise, and gentle water flow help reduce stress and promote comfort inside the tank.
- Maintaining stable water conditions: It is essential for keeping an axolotl aquarium healthy and balanced long-term. Staying ahead of this also means controlling algae and tank toxins before they overwhelm the system and compromise water quality.
Common Axolotl Tank Mistakes to Avoid
Setting up a healthy environment takes more than just filling a tank with water. Many first-time owners make small but critical mistakes during an axolotl aquarium setup.
- Overheating the water: High water temperatures in a tank cause stress, reduced appetite, and increased risk of illness. Anything above 72°F for more than a day or two is a crisis, not just an inconvenience.
- Using gravel or unsafe decor: Gravel or sharp decorations in an aquarium can be swallowed easily or cause serious internal or external injuries.
- Skipping water tests or cleanings: Irregular testing and cleaning allow toxins to build up, making an axolotl tank setup unstable.
- Introducing your axolotl too early: Adding an axolotl before the tank is fully cycled exposes it to harmful ammonia spikes.
- Choosing the wrong tank size: An undersized aquarium leads to unstable water conditions and limits natural movement.
- Skipping acclimation: Dropping an axolotl directly into a new tank without temperature and chemistry acclimation causes acute stress and can trigger shock. Always float and drip acclimate before releasing them.
Conclusion
A well-planned setup makes axolotl care simpler, safer, and far more enjoyable in the long run.
Taking time to prepare the tank correctly helps maintain stable water conditions, reduces stress, and prevents many common health issues.
Be patient with the process, as every small decision adds up to a healthier tank for the axolotl.
Rushing the process often leads to avoidable problems, while patience creates a balanced environment that is easier to manage daily.
Once the axolotl tank setup is complete, care becomes more about observation and consistency rather than constant fixes.
Watching an axolotl grow, move comfortably, and show natural behavior is rewarding.
Have a setup tip or mistake to avoid for setting axolotl aquarium? Add it in the comments to help new axolotl owners.